Kitchen backsplash tiles were only a few inches tall before the 1950s and were designed to shield walls from splashes while cooking. In modern times, the backsplash is an inseparable part of your kitchen aesthetics. No kitchen remodel is complete without a backsplash, even though it is one of the last components to be finished.
The one room in the home where you may play around with tile patterns is the kitchen. Kitchen wall tile designs can vary based on the interior themes. All the tile kinds that may be used in this area and different applications will improve your kitchen.
You must consider a tile's usefulness and placement within your design scheme while selecting it. Glossy tiles may not be appropriate for your floors even though they look great on a wall. You must strike a balance between its purpose and attractiveness at this point.
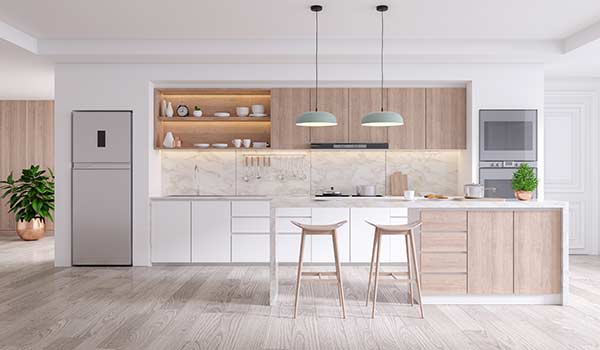
Backsplash on Kitchen Wall
Colour, shape, size, texture, installation pattern, or any of the above can make a bold statement in a backsplash. Compared to floors and entire walls, backsplashes are often small and inexpensive projects that DIYers may complete over the weekend (as opposed to floors and complete walls).
In a bathroom or kitchen, the wall space above the counters is a good location for splashes of all types, including water, soap, grime, and oil. Making use of this wall space as a prime decorating opportunity while also protecting your home is possible by covering it with sturdy kitchen backsplash tiles.
Recommendations for calculating the size and number of tiles needed:
- You should consider the space’s width and height when measuring your kitchen tile design area for a tile backsplash.
- Some kitchens are one long rectangle, making it relatively simple to gauge the space's width and height.
- However, most kitchens contain features like windows and cabinetry that divide the room into more manageable halves.
- It’s crucial to consider every space that will require tiling.
- Each area should be measured for height and width, and it should be given a capital letter designation.
- Divide the total area in square feet by 144 after multiplying the width and height to determine the area in inches (amount of inches in a square foot). For instance, if your space is 48’’ wide by 18’’ high, it is 864 square inches or 6 square feet.
- Make sure you measure and sum up the dimensions of each place that needs tile.
How to Select Kitchen Backsplash Tiles?
To get the new kitchen tile designs to gel perfectly in your kitchen backsplash, you need to have a few steps of checks:
1. Select the Appropriate MaterialGlass, stainless steel, pressed metal, and tiles are some of the backsplash materials that are most frequently used in kitchens.
Consider using tiles or pressed metal for a more conventional appearance. When selecting the material for your backsplash, consider cleaning. Despite having a more difficult time keeping clean than larger tiles with fewer joints and grout, mosaic tiles offer a lovely appearance.
Different Materials for Kitchen Backsplash Tiles
1. Ceramic TilesThe most popular backsplash material for kitchens is ceramic tile. Ceramic tiles can be laid in a wide variety of designs and come in a wide variety of forms, sizes, and colours. The size, thickness, and manufacturing method can all have a significant impact on the cost per tile.
2. Porcelain TilesWhile porcelain tiles are created from compressed clay particles burnt at high temperatures, ceramic tiles are made by firing and glazing wet clay. Porcelain tile is less common, has fewer types, and less ornamental alternatives than ceramic tile, but it lasts longer.
Although porcelain tile can't be customised as much as ceramic tile in terms of shape, size, colour, and pattern.
3. Vitrified Unglazed TilesUnglazed vitrified tiles offer a solid and natural stone-like appearance with sturdier material quality. These tiles are great if you are a fan of natural patterns and colours which are less artificial. You can choose from polished and stain-free tiles to achieve a superior glossy appearance with nominal maintenance needs.
H&R Johnson’s Terrazzo tiles fall in this category and boast of sealed micropores for better stain resistance in the kitchen.
4. Classic TilesClassic tiles are small 4x4” tiles in solid colours. You can get creative with these tiles as they are small, and you can fit several colour patterns within the small space for the backsplash. However, the glossy tiles can also give a neo-classic appearance.
5. Choose the Appropriate Colour, Design, and FinishIf you choose your benchtop material first, you will have already reduced your options.
Depending on the material you have selected, you can determine if you want your benchtop to be the focal point. Choose hues that are either complementary or contrasting with your benchtop colour if you want to add interest, or hues that are close to the tone of your benchtop for a more uniform appearance. The darker benchtop makes a good contrast with the light-coloured tile backsplash, but the whole effect is unified using complementary colours
6. Kitchen Backsplash Tile MaintenanceThe easiest way to maintain your backsplash tile is to use warm water to loosen dirt and then quickly wash down the surface with a sponge dipped in warm, soapy water. Maintaining this cleaning schedule can help your tile kitchen backsplash last longer and look better.
7. Sealing the GroutAfter the thin-set mortar has dried (often after 12 hours), combine the grout. By sweeping the grout float across the tiles in a vertical, horizontal, and diagonal motion, work the grout into all the joints. Grout should fill in all spaces between the tiles. There shouldn't be any air bubbles, gaps, or holes.
Matching the Kitchen Floor
Although floor tiles are mostly created for floors, you may still get inventive and utilise them for other things. These tiles are a superb and inexpensive option for backsplashes and counters in kitchens. Ceramics (non-vitrified), porcelain (vitrified), and natural stones are just a few of the materials used to make floor tiles, which are ideal for any kitchen project.
Since vitrified tiles are more resilient and long-lasting than other flooring options, using them in the kitchen is a fantastic idea. As floor tiles for the kitchen backsplash, you can choose tiles. Vitrified tiles have better resilience to survive spills, stains, and scratches. Thus, work better as kitchen floor tiles.
The best part is that you can use matt finish tiles for a better grip in the kitchen area with the same design prints as in other areas of the house. So, you can continue the theme in the kitchen while adding safety features.
ConclusionSeveral considerations will determine the perfect backsplash for your kitchen renovation. Ceramic (non-vitrified) is typically regarded as the ideal tile for kitchen backsplashes due to its reasonably wide range of prints and pocket-friendly prices.
Even though the price is frequently a deciding factor, bear in mind that up-front costs can be deceptive. As a result, be sure to also consider installation and maintenance costs. Also consider the material's durability, cleaning prowess, and impact on the overall beauty of the kitchen.
Frequently Asked Questions
Yes, you can fit new tiles by replacing the old worn-off tiles. The best thing to do is to remove the old tiles first then prepare the surface for the new installation. You will need to remove the old adhesive mix from the floor surface and clean the area before installing new tiles.
You should calculate the area of the surface which will need tiling. If there are windows or pillars you will need to deduct their surface area from the total floor or wall area. Then divide this from the tile area to get an approximate number of tiles you will need. You should always order 5-10% more tiles than needed to cover the wastage and future repairs.
Ceramic tiles require minimal maintenance. However, depending on the type of tile you will need to regularly remove the dust off the surface and give the tiles a nice clean wipe with warm water and dry them. This will keep their surface shining for a long time.